Showing posts with label nail design. Show all posts

Monday, 4 January 2016

NYE Nails

Hi!
Over Christmas I received a few random nail polishes as gifts. Usually I get much more than this, but lots of people told me they didn't know what I already had to get me any! 


I got 2 Cien polishes in 'Raspberry Glitter' and 'Metallic Rose', from Lidl. I tried these out and was surprised how good they were, especially for stamping with.
I also got Barry M 'Silver Foil Effects', George Gel Pro in 'Nude Pink' and an unnamed pink polish by High Brow, which I think came from B&M.

So, for my New Year nails, of course I had to use some of the new polishes:


They are not very New Year themed, but I like how they turned out. They are pretty, girly and glittery whilst still being simple and subtle.

I used George 'Nude Pink' as the base colour and Cien 'Raspberry Glitter' on my ring finger and to stamp on my index and middle fingers.

Hope you like these! xx

Wednesday, 23 December 2015

It's Christmassss!!

Hello!
So I know I said I would only be posting one photo per post, but as I am just restarting I wanted to show you some of the Christmas mani's I have painted this year! So this post will have several different mani's and several pictures!


I hand-painted these Christmas trees today, and these are the nails I will have for Christmas day.
I used Barry M 'Matte White' as a base colour, Revlon 'Rainforest' and Sinful Colours 'Kissy' for the Christmas trees and Ciaté 'Chinchilla' to add a bit of shading in the snow around the trees. I also sponged on some unnamed grey holo from Wonderful and Strange Nails, to add a bit of sparkle.


Next I have these adorable little penguins! I love these little guys, they are so cute!
I used Barry M 'Black Multiglitter' for the background, Barry M 'Matte White' for the tummies and eyes and NCLA 'I Only Fly Private' for the feet and beak.


I also painted some Christmas lights on my nails. These were very popular with my colleagues and my mum loved them too, although I wasn't too happy with the black lines.
I used W7 Gel polishes for the white background and the black line. Once these were set I then used Illamasqua 'Aorta' (Red) and 'Rare' (Yellow), Sally Hansen 'Pacific Blue' and 'Kiwi Bikini' (Green), and a small nail art brush to paint on the light bulbs.


Earlier in the month I had another Christmas tree mani. This is much more abstract, a dotticure tree!
I used Revlon 'Rainforest' as the green, Color Club 'Barely There' for the nude and Barry M 'Starlight' for the stars and glitter.


This was my first mani of December, so not too Christmassy! I went with more of a wintery, sweater look. I have no idea what polishes I used for this, it's too long ago to remember, sorry! I do know that the stickers were from last years Ciaté advent calendar.


Finally, I have this Rudolf mani, which I painted for my mum (Hence the awkward hand pose and misshapen nails!!). I used all gel polishes to do this. We mostly have W7 gels, but I know the Red is by OPI.


Sunday, 18 January 2015

31DC: Art

For 'Art' I decided to paint Van Gogh's Starry Night.

I very nearly changed my mind after noticing that Tara from Loki's Lacquer also did this painting. I was a little scared about mine being awful in comparison, but I decided to be brave and go for it anyway!


I actually really like how it turned out, although the blue is a little bit brighter than I had intended!
Mine is a little different stylistically to Tara's, which is good as it makes direct comparisons more difficult!

I used an unnamed blue polish from H&M as a base colour, then painted all the details with acrylic paint.

Go check out the other girls' artwork:


Saturday, 3 January 2015

31DC: Water Spotting

Today's prompt is a new technique for me: waterspotting.
I have seen some beautiful outcomes from this technique, however I have also seen some serious fails! Hence why I have never attempted it before!

It took a long time and lots of trial and error but I eventually got a half reasonable result!


I used Ciaté Ferris Wheel as my base colour and Essence Let's Get Lost! for the waterspotting, as I know this polish works well for watermarbling.

In case you're interested, here's the story of my disaster:

I didn't have any spray alcohol gel, so after watching a few YouTube video's I started off trying to use hairspray. Massive mistake. The hairspray just seemed to instantly dry the polish and make it sink to the bottom. So I tried again. But there was hairspray residue left on my water, which the polish sat on top of. I took my toothpick and tried to remove the layer of hairspray, but it seemed to be never ending. Each time I took some out, more filled the gap!
I emptied the water out to get rid of the hairspray and started again. But somehow, there was still hairspray on the water! Several cups of water and many toothpicks later it appeared hairspray-free.
So, if hairspray doesn't work, how am I going to do this?
*Trawls Google for another hour*
Aha! Acetone.
I dropped my polish onto the water, it dried instantly and sunk to the bottom in a ball because my water was too cold having come straight from the tap. Doh.
After microwaving my water, I again dropped my polish onto the water, let it spread, dipped a brush in acetone, flicked it at the polish andd... nothing happened? The acetone seemed to evaporate in the second it took to move the brush from the bottle, to the polish. So I tried again. This time I held the acetone over the polish, so it dripped in as soon as I took the brush out. I ended up with a massive clear circle in the centre of a tiny ring of blue. Third time lucky? I dipped into the acetone, which was as close to the glass of water as I could possibly get and gently tapped the brush over the polish, creating little 'holes'. Success! At last!

Conclusion: Biggest hassle ever! Safe to say I never intend on water spotting again!!


Thursday, 1 January 2015

Happy New Year

Just a very quick post today to say Happy New Year to all my followers! :)
And thankyou all for your support and kind words in 2014! Best Wishes for 2015.

Oh, and here is a quick shot of my New Year nails. :)


I used Colour Couture Are You Afraid of the Dark?, Barry M Starlight and Ciaté Sand Dune.

Sunday, 7 December 2014

12 Days of Christmas: Santa, Baby

Today the prompt was Santa and/or Elves.

I also just recieved my Ciaté Mini Mani Month Calendar, yay! So I wanted to incorporate some of the polishes from that.
BTW, I won't be posting swatches from the calendar on here each day but I will be posting them on Instagram @nailsmustbepainted so make sure you're following me if you want the updates! :)


The grey is Ciaté Sharp Tailoring (Day 2), the red is Ciaté Runway Ribbon and is a gorgeous loose glitter and the white is George Natural White. The Santa is a sticker I got from Poundland a few months ago! I am feeling poorly at the moment so didn't feel like concentrating long enough to do my usual freehand art.


Take a better look at that red glitter! I have never used a loose glitter before but wow this is gorgeous! The picture doesn't really do it justice. It is sooo sparkly and beautiful! 
I discovered just how difficult loose glitter is to clean up though!

Check out the other amazing entries:


Monday, 1 December 2014

12 Days of Christmas: Snowflakes

Hello!
This month I am planning on taking part in Challenge Your Nail Art's '12 days of Christmas Nail Art Challenge'. I have never managed to complete a challenge where I have to post more than once a week, so we'll see how it goes!!

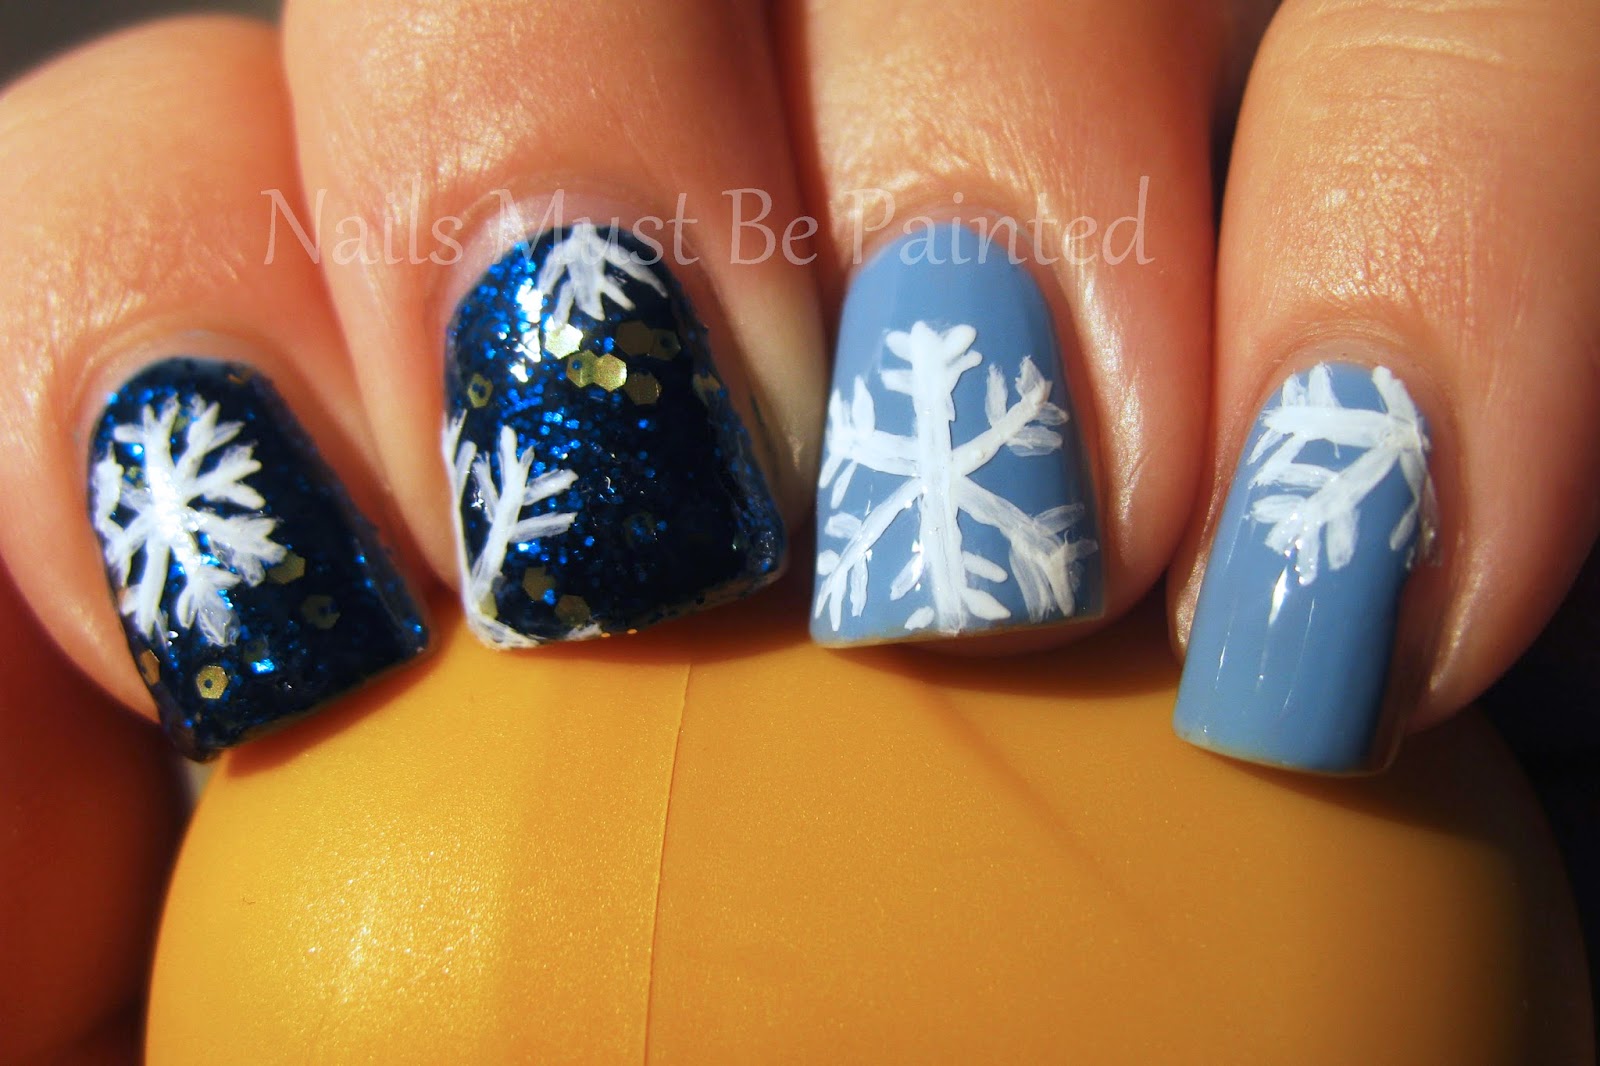
The first prompt is 'Snowflakes':


I love how these turned out! The two different blues really make me think of day and night.


I used L'Oreal Million Sapphire on my index and middle fingers and Make Up Gallery Sky Blue on my ring finger, pinky and thumb. 
That L'Oreal glitter is so perfect! Full, even coverage of glittery goodness in just two coats. Bad side, it peeled off in the shower. As a whole piece. Strange!
I then used acrylic paint and a tiny paintbrush to paint the snowflakes and finished off with my usual Essence Quick Dry topcoat.


See the other entries for this challenge here:


Thursday, 27 November 2014

Fringed Nail Art

Today I have some very... different nail art!
I heard about the Quiz Dress Your Nails competition and wanted to take part. I was looking through their dresses to find the one I wanted to use when I came across this fringed dress.


Straight away I knew what I wanted to do, I just had to figure out how I could possibly make it work!

A quick Google search found a grand total of 0 other fringed nail designs, so I had to figure it out for myself!!

.
This is how it turned out. Not quite what I had in mind, but not too bad!!


I had a nightmare trying to figure out how I was going to do this! I ended up using white cotton thread. I used a piece of kitchen towel, which I painted in Barry M Black. Once dry I began gluing pieces of cotton onto the kitchen towel. I then splodged the ends of the cotton with black acrylic paint and a small amount of gold Primark nail polish to get the colour.

Once I had two pieces of kitchen roll complete with 'dyed' cotton thread I painted the nail black. I then used clear topcoat to attach the kitchen roll pieces onto the nail, overlapping them slightly as is the case with the dress.


These didn't turn out quite as I had imagined, but it took an awful lot of experimenting and I am quite proud that I eventually found a way to make this idea work, even if they aren't the most attractive nail art! At least they are original! :)

Sunday, 23 November 2014

Glow in the Dark by Primark

A few weeks ago I bought two glow in the dark polishes in Primark. One looked yellow in the bottle but was a clear topcoat, the other was blue.
I didn't expect much from these. The blue barely glowed at all, as I expected.
But the clear topcoat was pretty impressive!

Here are my nails in 'normal' light:


I started with a base colour of Rimmel New Romantic. This was followed by a coat of the Glow in the Dark polish. Once all was dry I stamped on top using MoYou London Princess plate 08 and Rimmel Right Royal Red and topcoated with my usual Essence Quick Dry Topcoat.


Now you'll have to excuse the picture quality, photographing glow in the dark nails is so difficult!! I took around 100 pictures and this was the best I got.
But wow, I was amazed when I saw this in the dark! I did not expect it to be so bright! If you want a glow in the dark topcoat on a budget I definitely recommend this! Bargain!

Saturday, 22 November 2014

Plaid Scarf

I have been struggling to keep up to date with posting my nails on here recently so I will be playing catch-up over the next few weeks. If you follow me on Instagram, sorry you may be seeing some mani's you already saw on there!  If you don't follow me on Instagram, please start now!! @nailsmustbepainted. I update much more regularly than I do here!

Now for the nails...
I painted these a few weeks ago for The Nail Art Guild's Fall Fashion prompt, based on my favourite Tartan/ plaid scarf.


I painted these right before going to bed and didn't take photos until morning. Somehow through the night  my nice straight lines became distorted! I promise they were straight... the picture below is from Instagram and is the only photo I took straight after painting!


For these I used Maybelline Leather Effect in Mudslide Tote as the base colour. I then painted the red stripes using Maybelline Berry Sweet and the white lines using Ciaté Amazing Gracie.


I was really pleased with how these turned out, except for the smudged lines!


Tuesday, 11 November 2014

Remembrance Poppies

Here in the UK it is Remembrance Day today. We all buy and wear poppies to remember those who have served and those who have fallen for our country, allowing us to be where we are today. This also raises money for the Royal British Legion who support past servicemen and women.

This year I have painted two mani's for Remembrance Day.


The first is a watercolour mani which I love! Particularly my middle finger (macro above), which I am really proud of!
I used a George polish in Natural White as the base colour then created the watercolour using Rimmel Ready, Steady, GO! and Missguided Missmatch before painting the details of the flowers with acrylic paint.


Here is my second mani. It is very different and creates a darker mood. The 'poppies' are dried flowersfrom the Born Pretty Store and the cross is hand painted using acrylic. The base colour is Nails Inc Glamour Hanover Square which is a lovely colour.

At the going down of the sun and in the morning, we will remember them.

Wednesday, 5 November 2014

Firework Inspired Nails

Here is a very quick post to show you my nails for Bonfire Night.
I didn't have much time so it had to be something simple, so I opted for a bit of glitter to represent fireworks! :)


Excuse the poor quality picture from my Instagram (Follow me @nailsmustbepainted). I have been very busy!

The base colour is Nails Inc Wigmore Street, a very deep purple which was free with Glamour magazine. I then sponged On Rimmel Space Dust in Aurora, followed by Ciaté Party Shoes, for lots of glittery goodness! This looks much better than the picture!

Although this mani is super simple and took me about 5 minutes to do I really like it! The colours contrast nicely and the glitter creates a very firework-y feel.

Sunday, 2 November 2014

Halloween Nail Art

I have been very busy this week and haven't had much time to post, so all my Halloween nails are going to be under this one post. Yes, I am aware that I am late, Halloween was two days ago!

The first of these mani's was also done for the final instalment of the Llama Nails Movie/Book challenge. This week's prompt was Horror, so I based my mani on the Goosebumps series of books.


The purple is a Jess Polish called Madison and the green is La Femme Beauty Ultra Green.

The next is my favourite of the 3 halloween manis I have done.


I used W7 'Party' as the base for this mani and the spider and webs are decals from the Born Pretty Store. In real life they were much more subtle than the picture. I love them!

But, the best thing about this mani is that the W7 polish a a UV polish, so it glows. It's so amazing!! Although the UV light seems to make every little imperfection show up.


Excuse the poor quality picture from my Instagram. Somehow I don't seem to have taken any pictures of it glowing on my camera, only my phone.

Finally, my last mani. I wanted this to be very imperfect, which it is. Hence the lack of clean up!


I used Sally Hansen Sugar Coat in Sweetie and dabbed on Ciaté Boudoir to create the look of blood. I don't love this. But then I don't love Halloween themed mani's in general!


Thursday, 16 October 2014

Watermarble Nail Art Tutorial

This week I have created some watermarble nail art. 


Over the past few weeks a lot of my non-nailie friends have been sharing pictures of watermarble nails on Facebook, so I thought I would create a tutorial to show them how to do it! :)

The polishes I used were Essence, That's What I Mint!, OPI Kiss Me I'm Brazilian and OPI Where Did Suzi's Man-Go?

Here is a pictorial. See below for step by step instructions to go with it!

1. First paint the nails you intend to watermarble onto in a light colour: white or nude are good options.

2. Now, gather together everything you will need. Water, polishes (open the lids), cocktail sticks, Vaseline, kitchen roll.
Some people recommend filtered water, however I just use tap water. I do let it sit for about an hour beforehand though, to ensure it is room temperature otherwise the polish will dry too quickly.

3. Cover your cuticles and the backs of your fingers in Vaseline. This makes cleaning up afterwards so much easier! Careful not to get it on your nails though.

4. Now you are ready to start. Drip your polish into the water and allow it to spread.

5. Working quickly add drops of your other chosen polishes into the centre.

6. Once you have plenty of polish in there take a cocktail stick and move the polish around to create a pattern.

7. When you are happy with the pattern you have created dip your fingers in, nails down and leave them in the water. Use a cocktail stick to gather up any leftover polish floating on the water, otherwise this will ruin your mani when you remove your fingers.

8. Take the fingers out of the water. Ta Da! You have a beautiful watermarble design. Don't be tempted to dry your fingers yet, allow them to air dry or you risk smudging your marble.

9. The excess polish on your fingers should wipe away easily with kitchen roll, because you used the Vaseline. More accurate clean up can be done around the cuticles with acetone and a small angled paintbrush.

10. Now all thats left to do is paint the rest of your nails and topcoat. I like to use one of the polishes I used for the marble, to keep it matchy!

I hope this has helped.
Try it yourself!


Tuesday, 30 September 2014

Nails of the Month: September

I cannot believe it's that time of the month again for my favourites! This month has flown by!

My favourite nails on my blog this month were posted way back on the 1st September, my Kill Bill nails.

I think the simplicity of these makes them so effective, compared to some of my more detailed designs. Although, you liked the detail too! 

These Avatar nails were my most popular on Instagram:


And my Harry Potter nails were a favourite on Facebook.


Looks like everyone is loving the films this month!!
My personal favourite this month is yet another film mani. Alice in Wonderland!


These took such a long time and apart from the dodgy detail on Alice's face turned out exactly how I had planned - this doesn't happen very often! :)


What was your favourite this month?

Sunday, 14 September 2014

Alice in Wonderland Nail Art

This week the Llama Nails Challenge prompt is Fantasy books/films.
I had lots of possibilities for this prompt and had difficulty deciding which to do, which makes a change for me!! But I decided to go with Alice in Wonderland... the older animated version.


I absolutely love my left hand! Although I defo need to work on painting faces! Paha, Alice does not look very happy!


My right hand is much simpler but I still really like it.

These nails took me over two hours to paint and used a huge number of polishes and paints! It will take too long to say which polishes were used where, but I will list the polishes below the picture.


Sally Hansen Green Tea Basecoat, Sinful Colours Savage, Barry M Silk Heather, Barry M Matte White, Barry M Blueberry Ice Cream, Jess Calypso, Sally Hansen Grape Race, Essence That's What I Mint!, Rimmel Red, Steady, Go!, MUA Frozen Yoghurt, Rimmel Purple Pulse, Rimmel Sunny Days and Essence Quick Dry Topcoat.

I am really looking forward to the next few weeks of this challenge as the prompts are much more me!


Sunday, 7 September 2014

Harry Potter Nail Art

This week the theme for the Llama Nails Movie/Book Challenge is Mystery.
Again, this was a difficult one for me to think of a film for, so I turned to IMDB's top 50 Mystery films.

Harry Potter is not a film I would consider a mystery, but at least 4 of the films were in the top 50 mystery films, so I just went with it!! My mani is based around the Deathly Hallows films.


I'm really pleased with how these turned out! Particularly the round gradient!

I started with a base of a Nude Unnamed Revlon polish, over which I sponged a circular gradient of the same nude polish and Sally Hansen Kiwi Bikini. I was trying to recreate that eerie green Voldemort glow!!
 I then used Barry M Black and a thin paintbrush to paint the symbol of the Deathly Hallows and the Dark Mark on my ring and index fingers. On my middle finger I painted Harry's lightening bolt scar using Rimmel Sunny Days and outlined in Barry M Black. I then used a Jess Matte Topcoat on all but the lightning bolt, to make it stand out.


I enjoyed using the box as a photo prop way too much with this mani!! I don't know how I never thought of it before, as I have many of the films I have based my mani's on for this challenge on DVD!


Saturday, 6 September 2014

Watercolour Nails

Hello!
Today I have followed the SIMPLES tutorial to do some watercolour nails.
This is something I have wanted to try for quite a long time, but have never got round to doing!


I absolutely love how this turned out! So pretty!


I started with a basecoat of Barry M Matte White. For the watercolour I wanted to use a colour scheme, rather than a selection of contrasting colours. I chose to use Barry M Papaya, Sally Hansen Fuschia Flare and Revlon Infamous and mushed them all together using acetone!


It's so summery and pretty!
I expected the colours to be a lot lighter than they ended up, due to the acetone, but I still love it!

Monday, 1 September 2014

Nails of the Month: August

This has been a very busy month for me, so I have not actually posted that many mani's. Although, I have quite a backlog of mani's I have painted but never posted which will be coming up in September!

My most popular post on the blog this month was my Rocky Horror nail art. Although I like this mani, as it is based on one of my favourite films, I'm not a huge fan of the actual design of the mani, it's just not my style!!


On my Facebook page it was this cute Kitsch floral design I painted on my Mum's nails. I love this design!


My most popular Instagram post is actually of a mani I haven't posted on here yet! It will be coming up probably tomorrow so I'm going to keep you waiting for pictures of that one!! Or follow me on Instagram for a sneak peek! @nailsmustbepainted

My personal favourite post this month has been my 50 First Dates nail art.


I really like how although it is a skittle mani, the nails all go together fairly well and each nail represents something different from the film.