Showing posts with label yellow. Show all posts

Monday, 8 February 2016

Neon Dotticure

This week I have a bright summery mani to distract from this miserable weather we're having at the moment!


I have had this grey/neon yellow pattern pinned on my pinterest inspiration board for ages, but never got round to doing anything with it until now.

I used Ciaté 'Chinchilla' for the base, then used Barry M 'Black' and Illamasqua 'Rare' for the the dots. 

I really like how this mani turned out. It's just a shame my nails or so short and ugly at the moment! I think I'll be trying this design again with different colours once I get my nails back as I like them! 

Saturday, 31 January 2015

31DC: Complement and Contrast

Day 25's prompt was complement and contrast.
I opted to use complementary colours from the colour wheel. Pink and purple paired with yellow and orange in a colour blocked design.


Sorry about the Instagram photo. I painted and photographed these before I killed my laptop, so the 'proper' photos are still on my old laptop, where I cannot access them. :(

I started with a base of Ciaté Amazing Gracie, then used Sinful Colours Cream Pink, Maybelline Fuchsia Fever , Missguided Missmatch and Ciaté Big Yellow Taxi with striping tape to create the squared pattern.

I really love these!

Check out the other ladies work:


Thursday, 22 January 2015

31DC: Blobbicure

Before today I didn't know what a blobbicure was!
But I spent a few minutes on Google and soon realised I really didn't like them! Haha!

I needed to find a way to make a blobbicure I actually liked. At least vaguely!


So I made a Girafficure!! :P

I love how my ring and little fingers turned out, but not so much my middle and index fingers! The blobs on those are too far apart.

I used Revlon Buttercup and Revlon Tradewinds.

Check out the other blobbicures:


Wednesday, 21 January 2015

31DC:Green/Yellow

Today's prompt was three shades of green/yellow.

I sort of made these up as I went. I don't love how they turned out, but they're ok!


I used two shades of green to create a saran wrap background: Ciaté headliner, and Essence That's What I Mint! I then added a green and blue glitter 'Mosaic Nail Varnish' by Pretty and stamped leaves over the top with Revlon Buttercup and Born Pretty Store stamping plate BP-19.

Remember, you can get 10% of this stamping plate and many more with the code: EHG10.

Check out the other girls designs':


Monday, 19 January 2015

31DC: Fire

I wasn't very inspired by today's prompt of fire, so I apologise for my uninteresting nails today!!


I simply painted my nails in Ciaté Big Yellow Taxi, added a big blob of Colour Couture Red polish and used a dotting tool to smoosh them around a bit! Very technical!

I don't mind how they turned out, but I can't say I have strong feelings either way for them!

Look at the other ladies more interesting attempts at fire nails:


Sunday, 18 January 2015

31DC: Art

For 'Art' I decided to paint Van Gogh's Starry Night.

I very nearly changed my mind after noticing that Tara from Loki's Lacquer also did this painting. I was a little scared about mine being awful in comparison, but I decided to be brave and go for it anyway!


I actually really like how it turned out, although the blue is a little bit brighter than I had intended!
Mine is a little different stylistically to Tara's, which is good as it makes direct comparisons more difficult!

I used an unnamed blue polish from H&M as a base colour, then painted all the details with acrylic paint.

Go check out the other girls' artwork:


Monday, 12 January 2015

31DC: Film

Films are one of my favourite sources of inspiration, especially since doing the Movie/Book Challenge last year. However, because I did so many as part of that challenge it was difficult coming up with something new to do.

But then I remembered... Despicable Me!!
I know Minion nails have been done to death, hence why I have avoided them until now! But I love the film so wanted to do them anyway!


I was really pleased with how they turned out. And of course I had to take a picture of my minion nails with my minion toy!!


I used Ciaté Big Yellow Taxi and Sally Hansen Co-Bolt Blue. The details of the minion were all done with acrylic paints.

See which films the other girls based their nails on:


Sunday, 23 November 2014

Glow in the Dark by Primark

A few weeks ago I bought two glow in the dark polishes in Primark. One looked yellow in the bottle but was a clear topcoat, the other was blue.
I didn't expect much from these. The blue barely glowed at all, as I expected.
But the clear topcoat was pretty impressive!

Here are my nails in 'normal' light:


I started with a base colour of Rimmel New Romantic. This was followed by a coat of the Glow in the Dark polish. Once all was dry I stamped on top using MoYou London Princess plate 08 and Rimmel Right Royal Red and topcoated with my usual Essence Quick Dry Topcoat.


Now you'll have to excuse the picture quality, photographing glow in the dark nails is so difficult!! I took around 100 pictures and this was the best I got.
But wow, I was amazed when I saw this in the dark! I did not expect it to be so bright! If you want a glow in the dark topcoat on a budget I definitely recommend this! Bargain!

Tuesday, 9 September 2014

Monday, 1 September 2014

Crime Nails: Kill Bill

This week on the Llama Nail Challenge the prompt is Crime Movie/Book.
Again, this was a difficult one for me, but after looking through the Crime section of IMDB I knew exactly which film I wanted to do!


If you can't tell, these nails take their inspiration from Kill Bill.
I love the way the texture of the 'blood' contrasts with the smooth shininess of the black strip on my ring finger!


I used only polishes for this nail art:
Rimmel Sunny Days for the background yellow.
Rimmel Red, Steady, Go! for the blood.
The black stripe and handle of the sword are Barry M Black.
The Silver for the sword is Ciaté Fit For A Queen.

Check out the other Crime Nails done for the challenge:

Friday, 8 August 2014

50 First Dates

Hello! This week the Llama Nails Prompt is Romance Movies/Books.
I have based my mani on the film 50 First Dates and created a skittle, with each nail representing a different part of the film. This was one of my favourite films for a while!


I will explain the meaning behind each nail!
Thumb: Represents the sea, as the film is set on the island of Hawaii.
Index: This is the flower which is on the side of Lucy's car in the film.
Middle: Pineapples, as Lucy and her father pick a Pineapple every year on his birthday.
Ring: Newspaper, to represent the paper the family have reprinted each day for Lucy.
Pinky: Pink, the colour of the T-Shirt Lucy wears each day and her father has to wash each day!


Now for the polishes used:

  • Sinful Colors Kissy (Thumb)
  • Rimmel Sunny Days (Pineapples)
  • Sally Hansen Fuchsia Flare (Pinky)
  • Unbranded French White Polish (Middle and Ring base)

    The rest of the details were painted with Acrylics
I really like this mani. Although it is a skittle, the colours and themes seem to fit together really well.

Check out everybody elses mani's from the challenge:


Saturday, 26 July 2014

Yellow Quilting

Today I have done a Yellow mani, for the British Nails Bloggers Colour Me Crazy challenge.


I only own three yellow polishes as it is not a colour I wear very often. Like, at all!! I only really use them in Nail art.

For this mani I used Rimmel Sunny Days and Sally Hansen Sugar Coat Sweetie.


I decided to have a go at a quilted mani. I love the look of these but have been putting off trying it as I have a bad relationship with striping tape! Surprisingly, I managed OK with it today and I actually quite like how these turned out!


Sunday, 20 July 2014

Les Miserables

Hello! I haven't been able to post for a while as I have just moved and don't have internet until next Thursday! I'm using BT WI-FI at the moment and it is soooo slow and keeps disconnecting. There is only one picture in this post as it literally took an hour to upload!!

So this week the theme for the Llama Nails Challenge was Historical films/books. I decided to base this mani on the film Les Miserables. I'm trying to stick with films I would actually watch to base my mani's on so it was a choice of Les Mis or Titanic! I'm saving Titanic for later in the year, as I will be teaching it at school!


I also found out after doing this mani that it was Bastille Day on Monday, so it was quite an apt time to have this on my nails really!

The polishes I used were:

  • Barry M Matt White
  • Rimmel Red, Steady, Go!
  • Rimmel Golden Hour
  • Rimmel Sunny Days 
  • H&M Unnamed Blue


Friday, 4 July 2014

Gradient Tutorial

I created this amazing gradient a few days ago. After posting on Instagram there was a lot of interest and questions from friends, so here I have created a tutorial for everyone to have a go!! :)


First, I would recommend gathering together everything you will need.

  • At least 2 different coloured polishes
  • Base coat
  • Top coat, 
  • Nail polish remover/acetone (I use both, but one or the other will do!)
  • A sponge
  • Scissors (you may not need these depending whether you would rather use the sponge whole)
  • Clean up brush.


I am using Neon colours so the polishes I need are Barry M Matt White, Sinful Colours Cream Pink and W7 Fluorescent Yellow.

I started with a base coat. I use Sally Hansen Nail Nutrition, followed by a white layer of Barry M, as I am using neon colours and the white base helps make sure the colours stand out.


Once the white was dry I got my sponge. Some people say make up sponges are the best, but I just use a regular washing up sponge and have never had any problems! I find it easier to work with a smaller piece for better precision, so I cut a chunk off the sponge.


Now I would recommend opening all the polishes you want to use for your gradient, so you can easily get at them.

Hold the sponge, then using the other hand paint a small line of your first colour. Directly below this, paint a line of your second colour.


Now, the messy part! Sponge the paint onto the nail. Make sure you dab the sponge up and down a bit, so the colours blend in the middle and don't forget about the sides of your nails! It will end up all over your fingers, but don't worry about that!!
You can probably do 2 or 3 nails before you need to put more polish on the sponge, depending how fast you work. If it is starting to get tacky, or not transferring well, just put fresh polish lines on the sponge!


Now, depending how bright you want the colours, once the first layer is dry you can dab more polish on. In this picture you can see the colour difference between one layer and two layers.


That's the main part done, hopefully you're gradient should look something like this:


Now for the clean up. I use another piece of sponge and some Nail Polish Remover to clean the worst off my fingers.. It would take forever to clean all that with a clean-up brush.


Then I use some acetone and a clean-up brush to make sure my cuticles are all clean and tidy!
Follow with a layer of topcoat and you're done! I use Barry M 3 in 1 topcoat.


Ta Da!! Happy Gradient-ing!!


You can create lots of different effects with this technique, just by using different colours.
Here are a few other gradient manicures I have done:


Sunday, 29 June 2014

Neon Dotticure

Today I have another super summery look!
This weeks Simples challenge is a dotticure using different sized dots together. So this is what I came up with:


I really like this. It reminds me of glow-sticks! I think a splatter mani in these colours would be amazing!

I used Barry M Matt White as a base colour.
Then I did the dots with dotting tools, using Sinful Colours Cream Pink, La Femme Beauty Ultra Green and W7 Fluorescent Yellow which I placed randomly around the nails.

Saturday, 28 June 2014

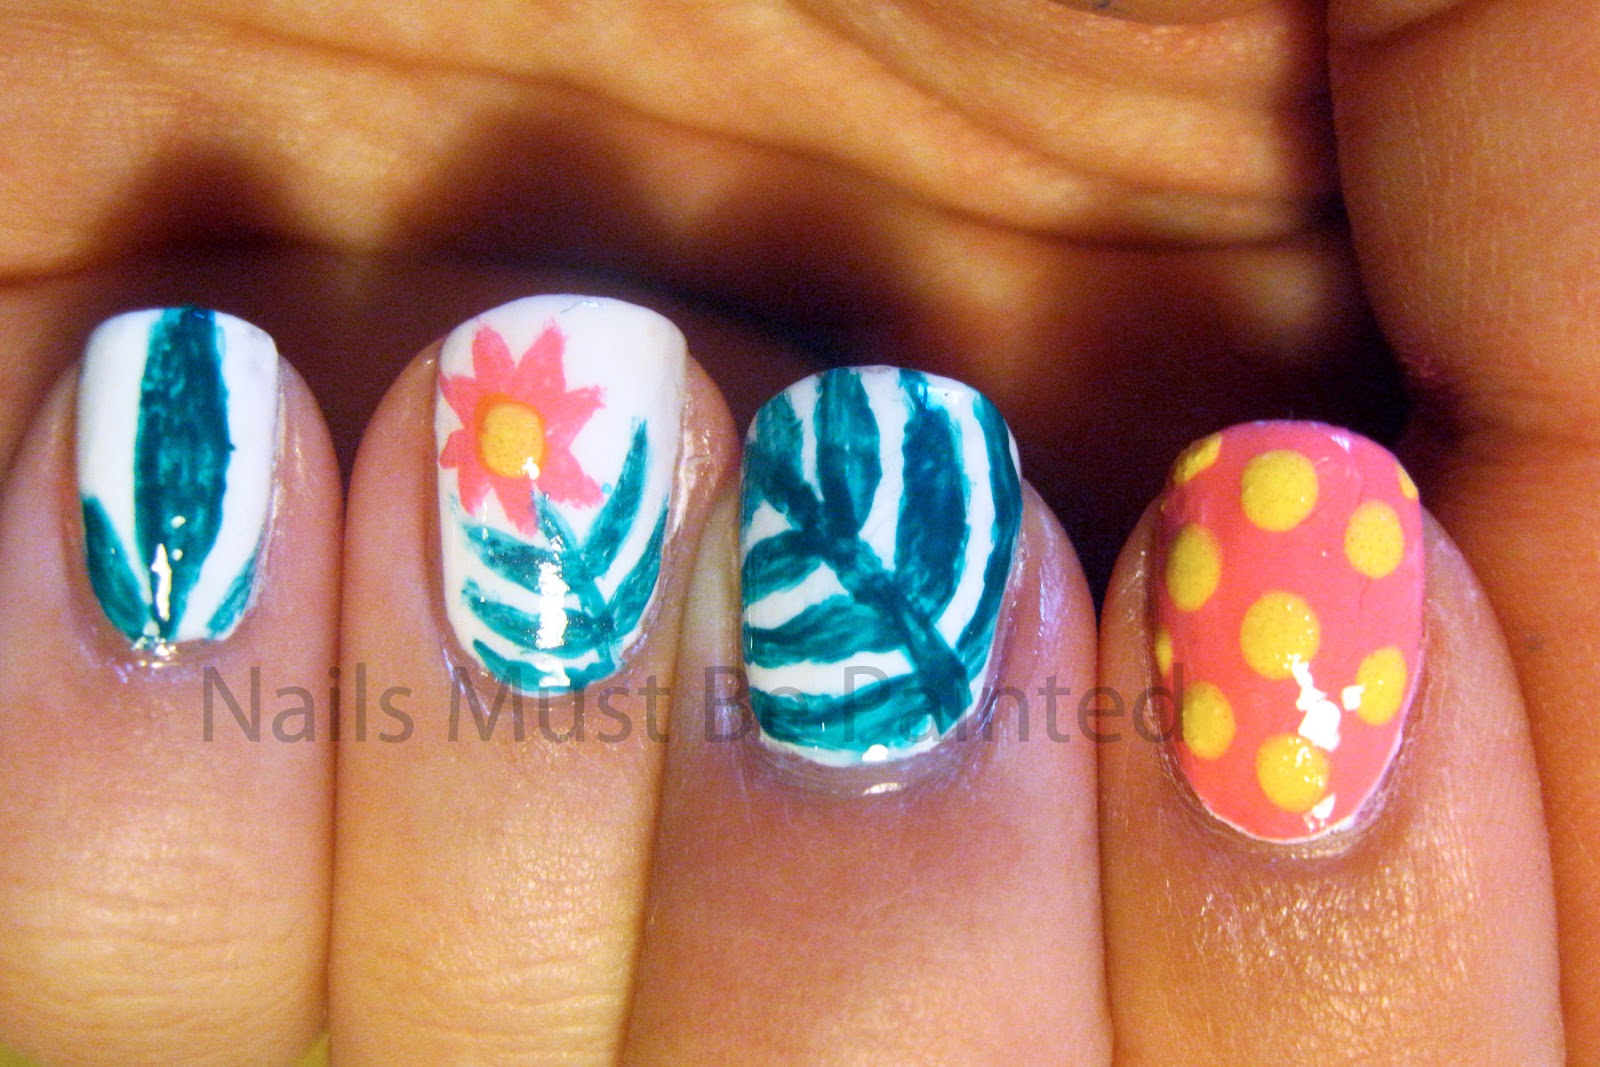
Tropical Leaves

Last week I discovered this lovely website, Print and Pattern. I saved it straight away, knowing it would be great for Nail art inspiration. So today, when I needed help thinking of something to paint I headed here for ideas!


 This is what I came up with! I found the pretty pattern below, which is by Holly Maguire Illustration and loved it so this was my inspiration! Simple to paint without much difficulty, but pretty and summery at the same time!


Here is a close up of the flower:


I painted this completely using polish.
 The white base colour is Barry M Matt White. 
The pink and green are both OPI; Kiss Me I'm Brazilian and AmazON, AmazOFF.
The Yellow is a Sally Hansen Sugar Coat polish in Sweetie.

I really like this! And it's not very often I have so much Green on my nails so it's a nice change!

Saturday, 24 May 2014

Neon Skittle

Today I have experimented with the ultimate summer mani!!
The Neon Skittle! It's so so bright, way too bright for everyday wear, but it's still amazing!


These are the polishes I used:
H & M, blue nail art polish
Sinful Colours, Cream Pink
W7, Fluorescent Yellow,
La Femme Beauty, Ultra Green
Missguided, Missmatch.

Friday, 9 May 2014

Pretty Poppies

The sun is shining and it has inspired me to paint these nice, summery Poppies. :)


This is probably one of my favourite mani's I have ever done. I love it so much!

I used Sally Hansen Sugar Coat in Sweetie, as a base colour.
I then used a combination of Rimmel Right Royal Red, Rimmel Coralicious, Sally Hansen Red Hot and Barry M Papaya, to paint the poppies, using the different colours for shading.
Finally, I finished using Barry M Black and a very thin detail brush to do the outlines and centres before covering in a Barry M topcoat.