Showing posts with label nail art. Show all posts

Tuesday, 16 February 2016

Taras Talons Order

Hey! Im a day late with this post. Sorry!

A few weeks ago you may know that indie polish maker Tara of Taras Talons had a sale on. Now, this is a brand I have been following on social media for a long time, however I have this little rule with myself that I will never buy a brand for the first time at full price... just in case!! So, of course I had to take advantage of this and buy a few to try.

I ended up with 6 of her polishes and this week I have managed to try out 3: 'Ol' Blue Eyes', 'Candy' and 'Fairy'.


First up was 'Ol' Blue Eyes'. As soon as I opened the parcels I needed to try this out! I am a sucker for a good blue polish and I found instant love with this polish!! It applied smoothly, opaque in two thin coats, is the most amazing electric blue AND it has a beautiful holo shimmer. 


Next I tried out 'Candy'. I loved this in the bottle and it applied well, again opaque in two coats which is great for such a light shade. However something about this polish didn't really do it for me. I think I expected some bigger pieces of glitter in there. I have nothing bad to say about the polish, it's just not a winner for me.


Finally we have 'Fairy'. Again, great application, becoming opaque in two coats. I didn't have to do much fishing for glitter in this which was good, though I did give it a good shake beforehand! This is another polish I really loved and can see myself getting a lot of wear from.

I did do some art over two of these polishes, but this post is going on a bit now so they can wait for another day! Or they are both already on Instagram if you want to check them out @nailsmustbepainted :) 

Monday, 8 February 2016

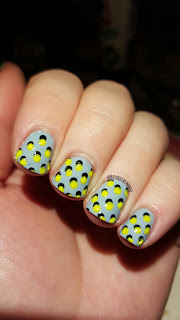
Neon Dotticure

This week I have a bright summery mani to distract from this miserable weather we're having at the moment!


I have had this grey/neon yellow pattern pinned on my pinterest inspiration board for ages, but never got round to doing anything with it until now.

I used Ciaté 'Chinchilla' for the base, then used Barry M 'Black' and Illamasqua 'Rare' for the the dots. 

I really like how this mani turned out. It's just a shame my nails or so short and ugly at the moment! I think I'll be trying this design again with different colours once I get my nails back as I like them! 

Monday, 25 January 2016

Rosey Stripes

Hey!
Unfortunately I'm having to rely on false nails this week. I went climbing with my dad yesterday and so I had to cut all my nails short, otherwise they would have been broken anyway.

I really really love how these turned out though and I hope they last and don't all pop off tomorrow!!


I used some striped falsies from Primark to start and a plain white false nail on my index fingers. Then I painted the index fingers pink using George 'Raspberry Forest'. I dug out some old Born Pretty decals I had which matched the pink polish and added a few of these to jazz up the mani a bit! 

Monday, 18 January 2016

Bedazzled

Hey!

Way back in November I bought a 2-pack of Rimmel glitter polishes. Up until now I still haven't got around to trying them out, so this week I decided that whatever I did with my nails I had to use one of them! So that's what I did!


I'm really pleased with how these turned out actually. :)

I used Barry M Black as a base on my index and middle fingers, followed by two coats of Rimmel 'Bedazzle'. I really like the colours in this glitter! I tried to match the other polish as closely as I could to the pink glitter, so I ended up using a really old unnamed pink polish by the sports brand 'Animal'.

Monday, 11 January 2016

Cheerful and Childish

Today's nails are, as the title says, very childish and cutesy. They make me feel cheerful and think of happy times!


I started painting my nails with very little direction or plan. I knew I wanted a gradient, so I picked two polishes at random to start with. I ended up with two Sally Hansen polishes: 'Pinch of Punch' and 'Coastin' By'.

The gradient I ended up with was cute, but felt it needed something else so I opted for some stamping. I used a plate from Born Pretty Store - MLS301, with a cute sweetie design and stamped using Barry M Silver Foil Effect polish.

I like how these turned out. They are very cutesy, remind me of unicorns and magic!! If only I hadn't had to cut all my nails short they would have looked even cuter!

Monday, 4 January 2016

NYE Nails

Hi!
Over Christmas I received a few random nail polishes as gifts. Usually I get much more than this, but lots of people told me they didn't know what I already had to get me any! 


I got 2 Cien polishes in 'Raspberry Glitter' and 'Metallic Rose', from Lidl. I tried these out and was surprised how good they were, especially for stamping with.
I also got Barry M 'Silver Foil Effects', George Gel Pro in 'Nude Pink' and an unnamed pink polish by High Brow, which I think came from B&M.

So, for my New Year nails, of course I had to use some of the new polishes:


They are not very New Year themed, but I like how they turned out. They are pretty, girly and glittery whilst still being simple and subtle.

I used George 'Nude Pink' as the base colour and Cien 'Raspberry Glitter' on my ring finger and to stamp on my index and middle fingers.

Hope you like these! xx

Saturday, 3 January 2015

31DC: Water Spotting

Today's prompt is a new technique for me: waterspotting.
I have seen some beautiful outcomes from this technique, however I have also seen some serious fails! Hence why I have never attempted it before!

It took a long time and lots of trial and error but I eventually got a half reasonable result!


I used Ciaté Ferris Wheel as my base colour and Essence Let's Get Lost! for the waterspotting, as I know this polish works well for watermarbling.

In case you're interested, here's the story of my disaster:

I didn't have any spray alcohol gel, so after watching a few YouTube video's I started off trying to use hairspray. Massive mistake. The hairspray just seemed to instantly dry the polish and make it sink to the bottom. So I tried again. But there was hairspray residue left on my water, which the polish sat on top of. I took my toothpick and tried to remove the layer of hairspray, but it seemed to be never ending. Each time I took some out, more filled the gap!
I emptied the water out to get rid of the hairspray and started again. But somehow, there was still hairspray on the water! Several cups of water and many toothpicks later it appeared hairspray-free.
So, if hairspray doesn't work, how am I going to do this?
*Trawls Google for another hour*
Aha! Acetone.
I dropped my polish onto the water, it dried instantly and sunk to the bottom in a ball because my water was too cold having come straight from the tap. Doh.
After microwaving my water, I again dropped my polish onto the water, let it spread, dipped a brush in acetone, flicked it at the polish andd... nothing happened? The acetone seemed to evaporate in the second it took to move the brush from the bottle, to the polish. So I tried again. This time I held the acetone over the polish, so it dripped in as soon as I took the brush out. I ended up with a massive clear circle in the centre of a tiny ring of blue. Third time lucky? I dipped into the acetone, which was as close to the glass of water as I could possibly get and gently tapped the brush over the polish, creating little 'holes'. Success! At last!

Conclusion: Biggest hassle ever! Safe to say I never intend on water spotting again!!


Friday, 5 December 2014

12 Days of Christmas: Do You Wanna Build A Snowman?

Today's prompt for the 12 Days of Christmas Challenge is Snowmen.
Of course, being a primary school teacher I had to paint everyone's favourite snowman of the moment... Olaf!!


I used a Primark Blue Glow in the Dark Polish for this. It doesn't actually glow, but the colour is just beautiful. Although the polish is blue, it has a very subtle gold shimmer which appears in certain lights. I also added a coat of Sally Hansen Sugar Coat in Royal Icing on my index finger. Olaf is painted using acrylics.

The snowflakes were sent to me to review by Born Pretty Store. 
They arrived in a little plastic pot which was actually a lot bigger than I had expected.


They are very cute and sparkly. Because they bend easily they sat quite flat on the nail, meaning they stayed on around a day... which is longer than I manage to keep most 3D type things on my nails! I would say they are definitely worth the £2.33 they are on the website for!

Get 10% off these here or other items at the Born Pretty Store with voucher code: EHG10.


Check out the other entries to the challenge here:


Monday, 1 December 2014

12 Days of Christmas: Snowflakes

Hello!
This month I am planning on taking part in Challenge Your Nail Art's '12 days of Christmas Nail Art Challenge'. I have never managed to complete a challenge where I have to post more than once a week, so we'll see how it goes!!

The first prompt is 'Snowflakes':


I love how these turned out! The two different blues really make me think of day and night.


I used L'Oreal Million Sapphire on my index and middle fingers and Make Up Gallery Sky Blue on my ring finger, pinky and thumb. 
That L'Oreal glitter is so perfect! Full, even coverage of glittery goodness in just two coats. Bad side, it peeled off in the shower. As a whole piece. Strange!
I then used acrylic paint and a tiny paintbrush to paint the snowflakes and finished off with my usual Essence Quick Dry topcoat.


See the other entries for this challenge here:


Sunday, 23 November 2014

Glow in the Dark by Primark

A few weeks ago I bought two glow in the dark polishes in Primark. One looked yellow in the bottle but was a clear topcoat, the other was blue.
I didn't expect much from these. The blue barely glowed at all, as I expected.
But the clear topcoat was pretty impressive!

Here are my nails in 'normal' light:


I started with a base colour of Rimmel New Romantic. This was followed by a coat of the Glow in the Dark polish. Once all was dry I stamped on top using MoYou London Princess plate 08 and Rimmel Right Royal Red and topcoated with my usual Essence Quick Dry Topcoat.


Now you'll have to excuse the picture quality, photographing glow in the dark nails is so difficult!! I took around 100 pictures and this was the best I got.
But wow, I was amazed when I saw this in the dark! I did not expect it to be so bright! If you want a glow in the dark topcoat on a budget I definitely recommend this! Bargain!

Saturday, 22 November 2014

Plaid Scarf

I have been struggling to keep up to date with posting my nails on here recently so I will be playing catch-up over the next few weeks. If you follow me on Instagram, sorry you may be seeing some mani's you already saw on there!  If you don't follow me on Instagram, please start now!! @nailsmustbepainted. I update much more regularly than I do here!

Now for the nails...
I painted these a few weeks ago for The Nail Art Guild's Fall Fashion prompt, based on my favourite Tartan/ plaid scarf.


I painted these right before going to bed and didn't take photos until morning. Somehow through the night  my nice straight lines became distorted! I promise they were straight... the picture below is from Instagram and is the only photo I took straight after painting!


For these I used Maybelline Leather Effect in Mudslide Tote as the base colour. I then painted the red stripes using Maybelline Berry Sweet and the white lines using Ciaté Amazing Gracie.


I was really pleased with how these turned out, except for the smudged lines!